Creating an internet site: 6 steps from zero to launch
Climbing a mountain takes months or years of hard work from training to actually hiking the mountain. If you want to create a website for your business, it is no different.
Most of the articles I write on my blogs are aimed at experienced marketers and those with a business website.
But that's not fair.
Some of my readers are just preparing to take their first steps on the marketing mountain, others just have verification from their first domain name registrar. Many are trying to decipher how to use a website template.
If you are one of those readers: I'm sorry. Hopefully I can make it up to you today.
The most common question I get from beginners is, "How do I create a website so I can test marketing tactics?"
That's a good question.
Today I'm going to go through the process of setting up a website from scratch. I've broken it down into clear steps and tried to make things as simple as possible. Everything from a site builder to using a website template to web design and using social media to develop your new business website.
Ready? Let's go…
Why you shouldn't rely on third-party websites when building a website
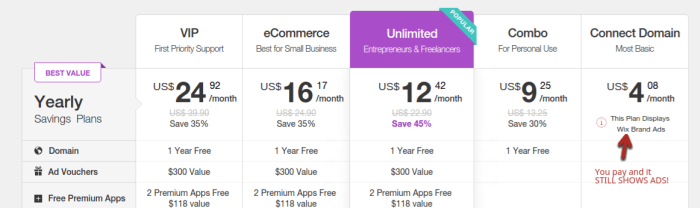
Everyone has seen advertisements for website builders, essentially website templates that "let you create a website with the push of a button!"
These are usually blogging platforms like:
- Blogger
- WordPress.com
- Tumblr
- TypePad
- Wix
Most offer free and paid plans depending on the complexity of the website, if you need web hosting, and how much traffic you expect.
I understand why these sites are really tempting when you first build a website, but you really should avoid them.
If you're just playing around and blogging as a hobby – no problem – feel free to use a website template.
However, if you are trying to create a business website, you can fail yourself.
Conclusion: don't do it!
Here are some reasons why you shouldn't use these websites to build a website.
Reason # 1: It doesn't save any money
They include you in the free offer after you have registered with the domain name registrar. But then you find that there is not much you can do with this free plan.
Of course, you can set up a simple blog, but it has ads (that won't benefit you), you get terrible support, and you have significant space constraints.
Then choose to upgrade to a subscription.
While they're not extremely expensive, they're not cheap either.
Compared to hosting your own website, building a website on a third-party website can be a lot more expensive as it tries to trick you into adding a bunch of features that you may not need.
Reason # 2: Third-party site builders are much more restrictive when building a website
This one is another killer for me. At first, you are not going to customize your website a lot – I get that. So it's great that you have the site builder and web hosting bundled together.
However, they will hold back the growth of your business website. Compared to a standalone content management system (CMS), you have very limited options in terms of web design, functionality, file access and the ability to customize your website – with proper branding versus a website template.
Reason # 3: Building a website just isn't easier on website template platforms
The final reason people are drawn to these website template platforms is because they promise to be "easier". For a first time owner creating a website, this is attractive.
In reality, I don't think they're any easier to use.
If you know what you're doing, you can have a WordPress business website set up in 5 minutes:
Every time you do it, you'll learn more and get better (and faster) at it.
The CMS that I'll show you later in this article are more powerful and easy to use than any of these third-party platforms for building a website.
Build a website Step 1: Your Website Must Live Somewhere (aka Web Hosting)
The first component in building a website is finding a web host.
It may seem intimidating, but it isn't.
Think of your website as a collection of files. If it is "hosted" on your computer (like all of your other files), only you can open it.
If you host these files on a web server, anyone on the Internet can connect to that server.
Hosting companies offer storage on these servers or even on your own dedicated web server if you are willing to pay for it.
That's really all.
You purchase a hosting package from a hosting provider, usually offered by the domain name registrar, and you can upload your website files (or offer plugins to make this easier).
Once you've connected that domain name (that's Step 2 – don't skip!), Anyone can view your website.
There are a few things that you might want to look for in web hosting.
Hosting factor 1: availability reliability
If your hosting isn't working properly, no one will be able to access your website. It's just as bad as having no website at all.
Any good hosting provider has no problem offering an uptime guarantee. Usually the web server displays a "100 percent network availability guarantee".
That doesn't mean your website will be up 100% of the time, but hopefully it's close to it. If your company website goes down, these guarantees usually mean you can be reimbursed with hosting credits.
What to expect, your website should rarely fail. If you suspect you are having problems, sign up for an availability tracking tool, such as:
Learn how often your website is down and whether you need to find a new web server to host it.
Hosting factor 2: customer service
Things will go wrong. Fact. If you are a beginner with websites, every now and then you will get confused.
Usually things are easy to fix, at least for an expert.
Suppose you do something or something that is beyond your control is causing your website to go down. The longer it's off, the more it will cost you.
If you made the mistake, your website will likely be unavailable until the problem is resolved. This is where you need good web server support. Most good support teams even have full backups of your website that they can restore in the worst case scenario.
Visit the website for details on the host's support team:
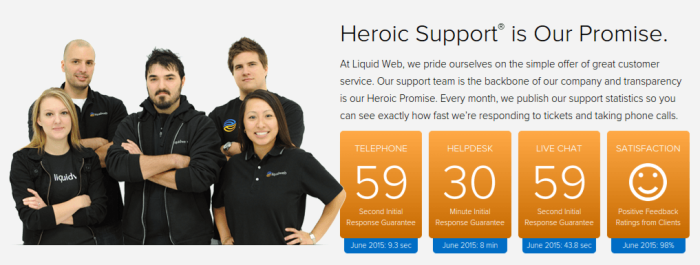
While you might enjoy using email, this is the absolute worst form of support when time counts.
You want to be able to contact your support via phone and / or live chat. Both are better, but at least one is necessary.
Hosting Factor 3: Site Speed Is King
I won't go into the details for now (they aren't important before you set up your website) but website speed is extremely important to SEO.
Not only do fast websites rank better, but having a fast website will also help you maximize your conversions.
Hosting is only part of the equation, but it's an important one. The difference between bad and good hosting can be over 50% difference in load time, which is huge.
How do you find a fast host?
This is difficult because there is no easy way to compare them.
Hosting speed is one thing that you won't be 100% sure about until you try (or if you get a trustworthy recommendation, I recommend Bluehost). However, keep the following best practices in mind:
- Avoid shared hosting: Shared hosting means that you share a web server with hundreds or even thousands of other websites. It's slow and if you are unlucky and share with spam websites your business website could even be penalized by Google. Either VPS hosting (sometimes shared but better) or dedicated hosting (best option) are solid alternatives.
- You get what you pay for Hosting is one of the biggest fees when starting a brand new business website. If you are on an extremely limited budget and want to go for the cheapest hosting, that's fine. For $ 5 a month, don't expect anything amazing. In general, the more you pay, the faster the hosting will be. Speed will help you connect in the social media world where you are likely to play around with ads and posts.
Spend some time on web hosting forums until you find some web hosts that you would like to try out.
Then compare services and prices and choose a plan that works for your budget. Next, you can move on to step 2.
Create a website step 2: Pick the perfect name
It's time to start thinking about what your website is about.
If you already have an idea, this will be easy. If not, find out what your great idea will be:
The reason you need to have at least a general idea of what your company website is about is that it's time to pick a name for it. You can search millions through domain name registrars, but take the time to find one that speaks to you.
Important note: There is no such thing as a perfect domain name. While some names may be a little better than others, it ends up being a very small part of your business compared to the actual content of your website.
Make up a few names using the methods below, set them aside for a night, and pick your favorite one in the morning.
Option 1 – brute force method
If you're a particularly creative person, you can try to find a great domain name yourself.
This was a lot easier years ago when less good domain names were given, but it's still possible if you get creative.
Select any domain name registrar (who can buy the domain from), then search for the domain names that you came up with. Here you can find out whether the domain is available for purchase or not.
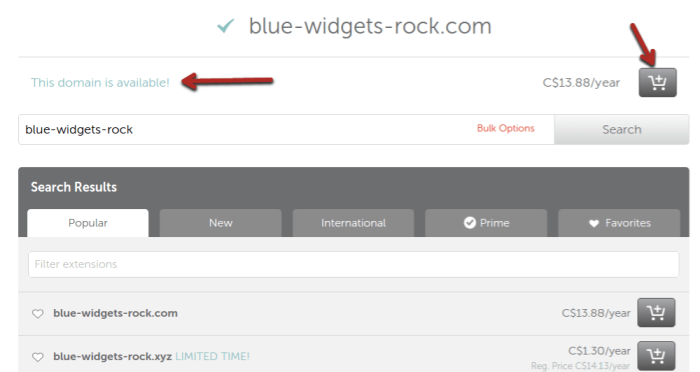
Note that even if the domain name registrar is trying to get you the deal of the century, you should try to avoid using hyphens in a domain name. If you're brand new, take some time to read this list of domain name best practices.
One of the highest rated domain registrars is Domain.com
Option 2 – Use a tool
If you need a little creativity, there are some great free domain name generators out there.
Enter a keyword or two and the generator will look for ways to combine those words into a domain name. The really handy part is that they also show you if the domain is available.
You can register a name using the link they provide (which is an affiliate link to a domain name registrar) or simply go to your preferred registrar and do so.
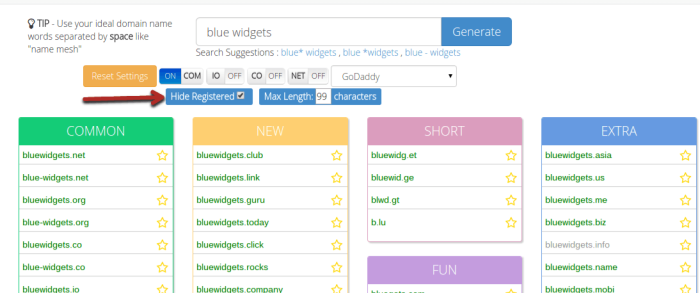
The first tool example I have is NameMesh. As the name suggests, it tries to connect words together. If you activate the "Hide registered" button, only the domain names that are actually available are displayed.
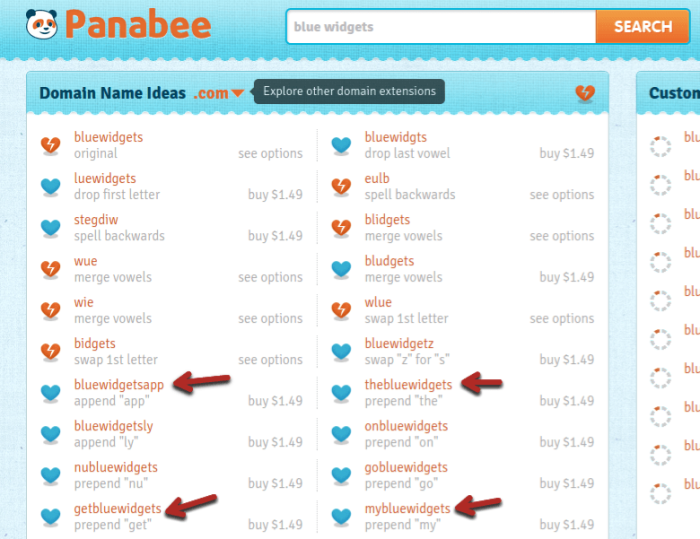
Another good tool is Panabee. It works the same way, but it can produce different results. If there is a blue heart next to the proposed domain name, it means that it is available for purchase.
A lot of the names are silly, but you usually get some that are pretty good.
Once you've chosen a domain name, you'll need to register it and then point your domain name to your hosting account. It's pretty easy. Your hosting company will send you an email with DNS servers (which look like web server addresses) after registration.
If you are using google "(domain registrar name) + DNS server" you can usually find a help document that will show you where to put your domain name on your hosting account.
In some cases, your preferred domain name may not be available. In this case, try confusing the words or adding a verb to the name.
Create a website step 3: Choose a CMS
CMS stands for Content Management System.
Remember to keep your website files on your hosting server. If you really wanted to, you can edit these files every time you want to make a change to your company website.
This is of course a kind of pain.
With a CMS you can edit your website via the domain yourself. You can log into the domain and then customize your layout, settings, and content, and create new posts and pages, often using easy-to-use website templates.
In other words, it makes building and updating a website a lot easier, and it will save you a ton of time.
There is no such thing as a perfect CMS. There are hundreds out there, some better than others. In general, however, all top models have different strengths and weaknesses.
I am assuming that you are just trying to get a relatively simple website or blog up and running. If so, stick with one of the popular CMS that I'm about to outline. It will make your life a lot easier.
If you're trying to build a custom web app or complicated tool, you need a custom solution. Either work with a developer for your project or hire a development company.
It is impossible to show you step by step how to install this on every web server. However, you can find a tutorial if you search on google or search for on youtube:
"Install (CMS Name) (Hosting Company)"
Option 1: WordPress
WordPress is the king of the CMS. This is by far the most popular option. It's easy-to-use templates for corporate websites and easy social media sharing.
Just to avoid confusion: WordPress.com is a third party website that you can blog for free but is WordPress.org Here you can download the WordPress software to install on a website.
WordPress became famous as a fantastic blogging platform. If your main goal is to set up a blog-based website, this is a great option.
It has a very intuitive admin backend that makes it easy to change the most basic website template options, as well as creating new posts and pages.
One area that is both a strength and a weakness is in plugins.
WordPress has over 57,000 plugins in its library – it's huge.
This is good because you can use plugins to get WordPress to do almost anything you want, including using social media to drive traffic to your company website.
However, not all aspects of plugins are good:
- You can bloat your website: It is important that you don't get carried away with plugins. Having too many will slow down your website significantly.
- They can be security risks: When plugins are kept up to date they are pretty much safe. However, since most plugins are free, they are often no longer maintained by the creators. Over time, they can become security risks and cause your website to be hacked.
- They are not heavily vetted / tested: Anyone can publish a plugin for WordPress without permission. So when you install a plugin you are taking a risk. Sometimes you update a plugin and it crashes your entire site.
Overall, plugins are good to have when you really need them, but try to minimize the number of plugins used. Please see this video for more information:
Option 2: Joomla
Joomla is right behind WordPress. It's not that intuitive, but it's still relatively easy.
Again, it's pretty easy to create and edit posts and pages, and you have some control over the website's settings.
Just like WordPress, Joomla has a large (not quite the same size) library of plugins. But these too have the same limitations. They are not tested by anyone and are often out of date, which creates security risks.
Option 3: Drupal
Of these first three website building options, Drupal is the most advanced. It's the hardest to learn, but more can be customized.
It's very similar to Lego blocks where you put the pieces you want together (not easy for beginners).
Instead of plugins, Drupal has modules. It's not as big as either of the alternatives, but there's a reason for it. Drupal shows you which modules are in active development and are being maintained. This goes a long way towards reducing the security risks of your company website.
I wouldn't really recommend Drupal for beginners, but if you know you need more advanced customization, this might be a website template option.
Option 4 – Rainmaker
The Rainmaker platform isn't as popular as the first three options, but I wanted to include it. It was developed by the geniuses at CopyBlogger. So you know it's a high quality product.
The reason I included it as an option here is because it's not just a highly polished CMS, but a CMS designed specifically for internet entrepreneurs.
Here are just a few of the features it offers:
- Create membership pages, forums, and online training courses
- Upload, manage, and sell digital products like software, e-books, and more
- Integrated analysis and reporting
- Built-in A / B tests
- Hosted in the cloud with upgrades, maintenance and security.
- Export content to WordPress at any time.
These are some very unique and useful features that solve problems that internet marketers often face without having to find a plugin or service to use.
You will find that many aspects look like WordPress since it is based on WordPress.
One caveat is on topics (I'll get to that in a bit).
Rainmaker is limited to Genesis topics. There are currently around 30 of them. If you like simplicity, finding an attractive topic is easy. So maybe it's not really a weakness.
Once you've chosen a theme, it's easy to apply any custom CSS or design changes you want:
A really big bonus is that it supports so many content types.
Instead of having to buy a landing page tool or find a good podcasting platform, you can use the content tools provided. This helps in building social media brands.
Finally, you can monitor the data traffic and optimize the conversion rate directly in the CMS. This is an incredible feature that was easily created and is great for beginners.
The main limitation is that if you want a feature that isn't built in, you will be out of luck. There are currently no plugins on the Rainmaker platform. So you see what you get.
Creating a Website Step 4: Choose Your Brand Identity
At this point you have set up some kind of website.
Now we have to do it great.
You install a theme for each important CMS. Designs are based on the basic CMS, but are customized to look and work differently. This can be used to create themes for different businesses: artists, entrepreneurs, podcasters, local businesses, etc.
I will go through the topics for the three main CMS described above. They all work practically the same.
How to Find a Great WordPress Theme for Building a Website
You have several options for choosing a WordPress theme. The first option is to search in WordPress.
Go to "Appearance> Themes" in the side menu and click "Add New" at the top:
You can sort topics by Featured, Popular, or any advanced "Feature Filter" you are looking for.
If you like the look of the topic thumbnail, click anywhere to bring up a preview window.
If you like the preview (in the right pane), click Install. Otherwise, click the "X" button and you will be returned to your search screen.
Once you have a theme installed, you need to activate it in order for it to glow on your website. You can do this right from the installation successful screen. Or go back to your main topic page and you'll see your new topic as an option.
Click on it like before, but this time there is an "Enable" option, as well as a "Live Preview" option if you're not sure you actually want to enable it.
The second option is to find a topic on a third-party website. These are usually premium themes. So expect to spend $ 30 to $ 60 for a topic. You can find some great free themes, but the best are all premium options.
It's a one-time fee and I recommend it if you are serious about your business. However, you can always start with a free theme and convert to premium later.
The most famous marketplace is Themeforest. However, if you'd like to try others, just search for "WordPress Themes" on Google.
There are many more options at Themeforest:
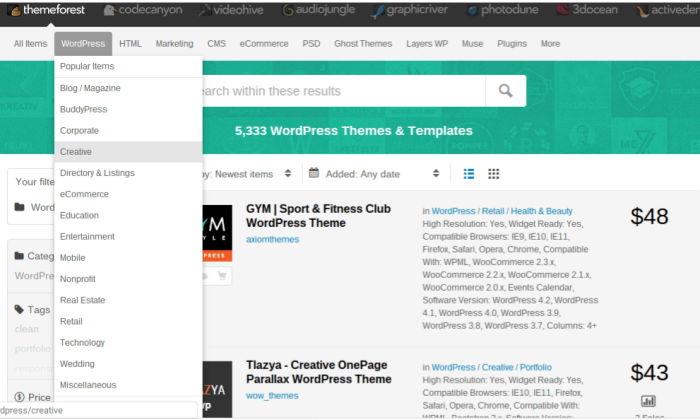
You can sort topics by category, tag, price, popularity, and more. On the right side you will see a price for the topic as well as the sales.
When you click on a topic, you'll see all of the ratings, plus a preview and more details about the topic.
With a premium theme, you not only get better themes in general, but also support from the theme creator himself, which can be very useful for beginners.
Create a Drupal-themed website
Like WordPress, Drupal has its own theme store. The difference is that it is outside of the admin panel.
The search engine isn't quite as friendly, but you still have a decent number of theme options (I wouldn't say as well as WordPress though):
In most cases there is no simple preview. So you need to go into each topic and look for links to documentation and demos.
When you find one that you like, under the intro for the topic, scroll down a little to the downloads section. Download one of the latest versions.
Pay special attention to the version number. Version 6 themes do not work with version 7 of Drupal and vice versa.
You need to upload the topic to the topic directory in Drupal:
/ sites / all / theme / yourThemeName
Then navigate to "Manage> Themes" and click "Activate" for the new theme. Finally, you need to go to the user settings and select the new theme.
If it sounds difficult, here's a quick tutorial to show you how to do it:
You can also buy premium themes for Drupal which I highly recommend. They're a lot easier to browse and usually look better in terms of a website template. Again, you can use Themeforest or any other theme marketplace you want.
Create a website with a Joomla theme
Joomla is a little different in that you have to find a topic on a third party website. However, if you were looking for "free Joomla themes" you will find plenty of solid free options.
Alternatively, you can continue to use Themeforest or another premium marketplace.
Installation is pretty easy. You need to download the theme and then upload it to your CMS.
Check out the following video to see how to do it:
Building A Website Step 5: How To Edit Your Website Without Messing Everything
I remember being a complete beginner on the internet and afraid of damaging a website. While it's unlikely to happen if you're careful, it can happen.
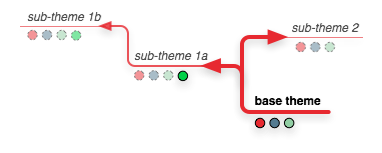
One of the most important steps in creating a website is to use a child theme to protect it. A child topic is usually a stylesheet that is kept separate from the rest of the files in your topic on the web server.
You can put CSS in a subtopic to customize the look and feel of your website. There are two reasons you might do this:
- It's hard to break your website. You can go into your hosting at any time and just remove the sub-theme files if necessary.
- It protects you from updates – When you update a theme in WordPress (which is often needed for security reasons), any changes you made to the theme files themselves will be deleted. A child topic is not affected, so you don't have to waste time repeating your changes.
Create a sub-topic in WordPress
The reason most websites get hacked is because of outdated software. Given the frequency with which WordPress, its themes and plugins are becoming out of date, you will always need to update everything on your web server whenever possible.
A minor theme is a necessity in WordPress.
To create a sub-topic, you need to create a new CSS sheet (you can use a simple text editor) and add basic topic information as shown below.
From there, all you have to do is upload it to WordPress (like any other theme) and activate it. Since your child theme has no functionality, WordPress will continue to use the parent theme (provided you identify it correctly in the child theme).
Here is a complete and simple guide on how to create a child topic.
Once you have a child topic, you can view it by going to View> Editor. You can add any custom CSS you want and then click Save for your changes to take effect.
Create a subtopic in Drupal
If you choose Drupal you won't be able to create a "child" topic, but you can create a "subtopic".
It's the same concept. You can apply styles to subtopics that override the parent topic.
Here is a complete guide on how to create a Drupal subtopic.
Create a double topic in Joomla
You cannot create child topics in Joomla. The closet you can get is to create a double theme.
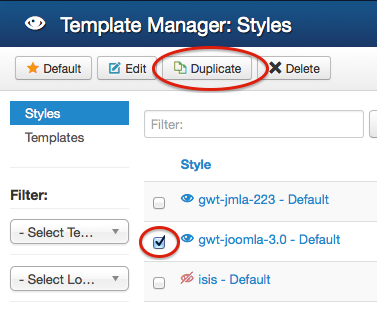
When you click Duplicate, it will make an exact copy of the original topic and make it the default copy.
Note that unfortunately this is not the same as a child topic. Essentially, you create a new duplicate topic every now and then to act as a backup in case something goes wrong.
Schritt 6 zum Erstellen einer Website: Beginnen Sie mit der Vermarktung Ihres Unternehmens
Zu diesem Zeitpunkt sollten Sie eine Website haben, die funktioniert und anständig aussieht.
Sie können endlich den größten Teil des technischen Teils des Erstellens einer Website abschließen und mit den Dingen fortfahren, die Sie ursprünglich tun wollten.
Versuchen Sie, die folgenden vier Schritte auszuführen, je nach Projekt oder Geschäft.
Schritt 1: Holen Sie sich ein Logo
Sich selbst zu brandmarken ist wichtig. Ein Logo ist eine der wichtigsten Methoden, mit denen Kunden Ihr Unternehmen erkennen.
Wenn Sie bereits ein Unternehmen haben, haben Sie möglicherweise ein Logo, was dies einfach macht. Wenn nicht, müssen Sie eine erstellen lassen. Hier sind einige verschiedene Optionen, um Designer zu finden:
- Fiverr: Sie zahlen 5 bis 20 US-Dollar, um ein Logo zu erhalten. Für diesen Preis erhalten Sie kein fantastisches Logo, aber es kann in Ordnung sein, wenn Sie loslegen.
- Upwork: Wenn Sie hier einen Job veröffentlichen, bewerben sich Designer, um Ihr Logo zu erstellen. Ausländische Arbeitskräfte sind in der Regel sehr billig, während erfahrene westliche Designer einige hundert Dollar kosten könnten. Wieder bekommen Sie, wofür Sie bezahlen.
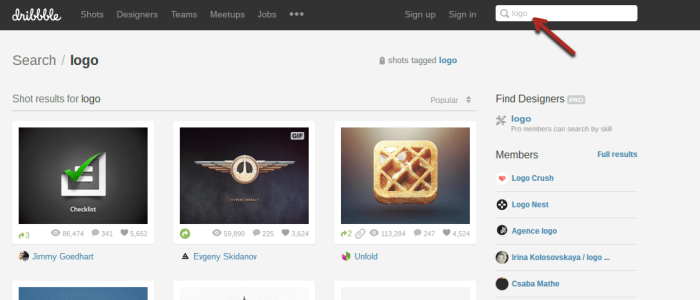
- Dribbble: Wenn Sie ein erstklassiges Logo wünschen, suchen Sie auf Dribbble nach „Logo“. Durchsuchen Sie die Entwürfe, bis Sie einen Designer finden, den Sie lieben. Kontaktieren Sie sie und mieten Sie sie. Dies ist die teuerste aller Optionen.
Schritt 2: Schreiben Sie Ihre Website-Kopie
Im Moment haben Sie eine ziemlich leere Website. Machen Sie sich zunächst mit Ihrem CMS vertraut. Erstellen Sie dann grundlegende Seiten, z. B. die Seite "Info".
Füllen Sie als Nächstes Ihre Homepage mit den ersten Nachrichten aus, die neue Besucher sehen sollen.
Schritt 3: Installieren Sie Google Analytics
Während Analysen nicht sofort von Bedeutung sind, möchten Sie sofort mit der Datenerfassung beginnen.
Installieren Sie den Google Analytics-Code auf Ihrer Website, damit Sie alle Besucher verfolgen können. Lesen Sie dann diesen Leitfaden zu Google Analytics, damit Sie verstehen, wie Ihre Website funktioniert.
Schritt 4: Planen Sie Ihre Marketingstrategie
Nachdem Sie eine Website haben und wissen, wie Sie sie verwenden, ist es an der Zeit, herauszufinden, wie Sie Besucher auf die Website bringen.
Ich habe unzählige Artikel über das Erstellen von Marketingstrategien und das Generieren von Traffic geschrieben. Jetzt können Sie sie endlich verwenden:
Fazit
Bevor Sie mit den sechs Schritten zum Erstellen einer Website beginnen, muss ich Ihnen noch eines sagen: Seien Sie geduldig.
Jeder hat ein bisschen Mühe, seine erste Website zu erstellen, und die meisten haben Schwierigkeiten, ihre ersten Websites zu erstellen. Sie werden besser, je mehr Sie üben.
Wenn Sie mit etwas frustriert sind, atmen Sie tief ein, entspannen Sie sich für eine Minute und googeln Sie dann Ihr Problem. Wenn Sie sich an eines der CMS in diesem Artikel halten, gibt es Tutorials für fast alles da draußen.
Alternativ können Sie auch Youtube verwenden. Es ist oft einfacher, einem Video zu folgen, als einer Text-exemplarischen Vorgehensweise.
Und während Sie eine Website zum Laufen bringen, werden Sie nicht über Nacht zum Erfolg. Es ist Ihr erster Schritt auf den Berg.
Lernen Sie weiter, testen Sie weiter und Sie werden langsam aber sicher echte Fortschritte sehen.
Wenn Sie Fragen zum Erstellen einer Website haben, lassen Sie es mich in einem Kommentar unten wissen. Ich werde versuchen, die Dinge zu klären.